React Without `create-react-app`
This is a tutorial for setting up a React project without using the tried-and-true create-react-app. This is the process I went through setting up my minesweeper project because I was curious to know more about how Webpack and Babel work behind the scenes in React projects.
Let's start by creating a directory for our project.
> mkdir minesweeper
> cd minesweeper
> npm init
This will initialize our node project with a package.json file. You can click return to enter the default parameters. The package.json file contains metadata about the project, including package dependencies. My package.json looks like this so far:
{
  "name": "minesweeper",
  "version": "1.0.0",
  "description": "A minesweeper game",
  "main": "index.js",
  "scripts": {
    "test": "echo \"Error: no test specified\" && exit 1"
  },
  "author": "Nicole Orchard",
  "license": "ISC"
}
Next let's create the scaffolding of our React app.
> mkdir src
> touch src/index.html
> touch src/index.js
> mkdir src/components
> touch src/components/App.jsx
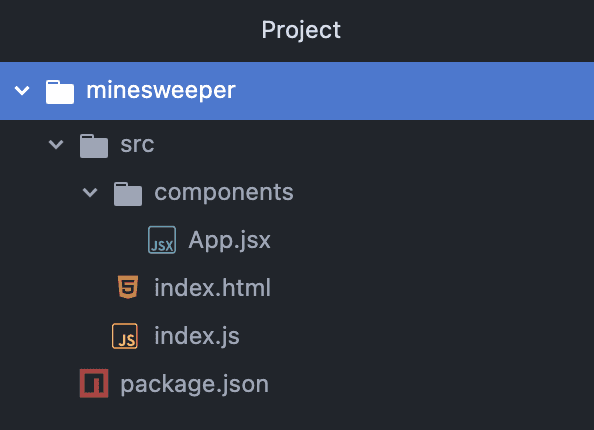
Now our project should look like this:

Let's write our index.html file, which is the entry-point of the React app.
<!DOCTYPE html>
<html>
  <head>
    <meta charset="utf-8">
    <title>Minesweeper</title>
  </head>
  <body>
    <div id="root">
    </div>
  </body>
</html>
You'll notice that all we have in the html page is a div element with an id of root. We'll use React to render our game inside of this one div. In order to use React, we'll need to install the React library. We need two React packages for our project.
> npm install --save react react-dom
If you take a peek inside of your package.json file you'll notice that these two dependencies were added there. Now we can write our index.js file:
import React from 'react';
import ReactDOMClient from 'react-dom/client'

const root = ReactDOMClient.createRoot(document.getElementById('root'))
root.render(<h1>Minesweeper</h1>)
We are importing the react and react-dom libraries. Then we render what looks like an h1 element. In reality, this is JSX, which is React syntax. Our <h1>Minesweeper</h1> code will compile to
React.createElement('h1', {}, 'Minesweeper');
Now would be a good time to see our app in action. In order to serve our app, we'll use Webpack. According to the web, Webpack is a free and open-source module bundler for JavaScript. Webpack takes modules with dependencies and generates static assets representing those modules. In our case, the modules and dependencies are our index.js, react, and react-dom. Webpack will bundle them into a single Javascript file for our html file to load. Html-Webpack-Plugin will inject that single bundled Javascript file into our index.html file. Webpack-Dev-Server will serve our web application from those new resources.
> npm install --save-dev webpack webpack-dev-server html-webpack-plugin path
There is one more thing we will need - Babel, which is a Javascript compiler. Remember how I mentioned that our <h1> tag looks like HTML, but it's actually JSX? Webpack needs to be configured with a Javascript compiler so that it knows how to compile JSX and ES2015 to basic Javascript that can run in any browser. We will also need a loader, or compiler, for our css styles.
> npm install --save-dev @babel/core babel-loader @babel/preset-env @babel/preset-react css-loader style-loader
Great, now we have everything we need to configure Webpack to serve our application. We will also need a config file for Babel to know which presets to use.
> touch webpack.config.js .babelrc
My webpack.config.js file looks like this:
const path = require('path');
const HtmlWebpackPlugin = require('html-webpack-plugin');

const HtmlWebpackPluginConfig = new HtmlWebpackPlugin({
  template: './src/index.html',
  filename: 'index.html',
  inject: true
})

module.exports = {
  entry: './src/index.js',
  output: {
    path: path.resolve('dist'),
    filename: 'index_bundle.js'
  },
  module: {
    rules: [
      { test: /\.js$/, use: 'babel-loader', exclude: /node_modules/ },
      { test: /\.jsx$/, use: 'babel-loader', exclude: /node_modules/ },
      { test: /\.css$/, use: ["style-loader", "css-loader"] }
    ]
  },
  plugins: [HtmlWebpackPluginConfig]
}
My .babelrc file looks like this:
{
    "presets":[
        "@babel/preset-env", "@babel/preset-react"
    ]
}
Now we can run our dev server and we'll find our app running at http://localhost:8081/.
> webpack-dev-server --mode development
We don't want to have to type out this command every time we run our server, so let's create a start script in our package.json file:
"scripts": {
  "start": "webpack-dev-server --mode development",
  "build": "webpack --mode production"
}
Now we can just run:
> npm start
Great job. We're ready to start developing our minesweeper game 🎉